Here is a look I came up with for this year's prom, as many of my teen viewers have been requesting that I do a look dedicated to this special event in any teen's high school life. Not only will this look match pretty much any dress color, but it will also photograph really nicely. Make sure to choose a foundation without SPF or any mineral sunscreen in it for the special night, since you'll probably be doing a lot of flash photography (whether it's with your own camera or by a professional), and that can cause flashback in pictures.
Watch my tutorial how to get this flattering look!
Products used:
Kryolan Eyeshadow base, Catrice Black gel eyeliner, Smashbox Smokebox II, Smashbox Softbox II, MAC Malt and Soft Brown, L'Oreal Infallible eyeshadow in Hourglass Beige, Anastasia Brow Duality in Matte Shell, Rimmel Scandaleyes, L'Oreal Magic Lumi primer (used as highlighter), MAC Beauty Powder Blush in Play in Proper, Aleverde Desert Rose blush, Catrice Lost in the Rosewood lipliner, Revlon Colorburst lipgloss in Pink Ice
If you already had prom, what was your dress color? Mine was this lacy black and blue number. It was pretty awesome!
I wanted to try out a very glamorous makeup up look that would be perfect for photo shoots, or a special evening make-up when you want to look very dolled up! Maybe an evening wedding reception, a fancy restaurant, a night at the Opera, whatever...
If you want to try it out, check out my step-by-step tutorial!
Now the bad part...I filmed this video months ago so I don't recall every single product that I used. Sorry! But here's a partial list of some of the products I do remember.
Eye shadows:
I don't remember the exact shadows I used, but to recreate this look you will need 1 light shimmery beige color, one mid-tone brown shimmery color, and a dark matte brown shadow. For the liner use a matte black shadow, and for the highlight a matte skintone color that suits your own skin color.
Cheeks:
MAC Shimpagne Mineralize Skinfinish (LE), and sorry I don't remember the exact blush!!
Lips:
Milani Lip Flash Nr. 4 "Photo Flash", L'Oreal Infallible Gloss in Starshine
I've finally recorded my travel vlogs from my trip to East Indonesia in December 2012, and I wanted to share with you my impressions of the country. My boyfriend and I backpacked around the Maluku Islands region, which is a very remote part of the country that is largely untouched by mass tourism. We visited the Banda and Kei islands, where tourists are few and far between. If you want more information about this beautiful (albeit sometimes hard to reach destination) this is the best website with relatively up-to-date information: http://www.east-indonesia.info/
I included a lot of pictures in the video to make it interesting, but yes the vlogs are long! A lot happened, and I unfortunately ended up getting extremely ill at the end of my trip which forced us to cut out journey short to seek medical help. It was a nightmare ending to an otherwise adventurous and beautiful trip.
Part 2 goes into detail about what happened to me after getting extremely ill with Dengue Fever, a tropical disease transmitted through mosquito bite, and how we managed to make it home safely after what seemed like a nightmare week and a half.
Enjoy watching! Have you ever had a terrible experience in a foreign country, health or otherwise? What happened? Share in the comments!
This hearty beef stew is one of my favorite meals to make on cooler nights, or when I'm in the mood for some comfort food. I took a traditional beef stew, and amped up the vegetable content quite a bit to make it a bit more healthy, than just meat and sauce. Are you a vegetarian? No problem! Substitute chick peas and/or lentils for the beef, and adjust the cooking time accordingly.
600-800g of stewing beef, cubed (about 1.5 lbs)
2 medium sized onions, slivered or diced
200g mushrooms, quartered (0.5 lbs)
4 celery stalks, chopped
300g pumpkin or squash, cubed (optional)
2 garlic cloves, minced
1 medium can of unsweetened corn, rinsed and drained
1 red bell pepper, chopped up
4-5 medium carrots
4-5 firm cooking potatoes, cut into bite sized pieces
1 medium can peeled and chopped pelati tomatoes
Worcestershire Sauce
300ml dry red wine
800ml beef stock
1 large tablespoon tomato concentrate
salt and pepper
Thyme, dried or fresh
Sweet paprika
cumin
chili flakes (optional)
1. Heat up some oil in a very large cooking pot, preferably with a lid. When oil is very hot, brown the stewing beef on all sides on high heat, then remove from pot and put aside on a plate.
2. In the same pot, add a bit more cooking oil, then brown the slivered onions for 2 minutes. Then add the garlic and stir-fry for another minute or so before adding the carrots, pumpkin, celery, and red pepper. Stir fry the vegetables for 3-4 minutes on high heat. Season with some sea salt and fresh black pepper, and add 1 teaspoon chili flakes if you want a bit of kick to your beef stew.
3. Add the beef cubes back to the vegetables in the pot at this point, including any juices that came out. On high heat, add the tomato paste and stir. Add any seasoning you like: I added some thyme, sweet dried paprika, and cumin. I don't measure these, but I'd say anywhere from 2-3 teaspoons is good!
4. Douse the entire contents in the pot with the red wine, beef stock, several glugs of the Worcestershire sauce, and add the entire can of pelati tomatoes. A good rule of thumb: The ingredients in the pot should just be covered all the way to the top with liquids, so no vegetables "stick out". Add more water or beef stock to adjust.
5. Place lid on the pot, leaving a small crack on the side, and let simmer on medium heat (it shouldn't be a raging boil) for about 1 hour to 1 hour 15 minutes. Now add the mushrooms and drained corn, and continue to simmer for another 20 minutes or so. If a lot of the liquid has evaporated at this point, add some more water and/or beef stock so that the stew has enough liquids to cook in.
6. Once meat is nearly tender (try a small piece, it should not be too tough anymore), add your potatoes and continue to simmer your stew. The potatoes should take anywhere between 25-40 minutes to be done, depending on the variety you use, and the size of the pieces. Just keep an eye on things, make sure there's enough liquid, and try a potato or a piece of meat now and then to see how things are going. The meat should be tender after this long cooking time.
7. Finish off with any seasoning you like (salt, pepper, hot sauce) to adjust to your taste, and serve piping hot. Enjoy!
Since cutting my own hair into bangs a few days ago, I've been looking for styling ideas on the Internet. One of my favorite looks is the way Taylor Swift is rocking her bangs lately. Now as a foreword, her bangs are not cut the way mine are, hers are fuller and cut a bit more bluntly than my own, and they are longer. (I hate hair in my eyes!) I do love how she combs it all into her face, and how the rest of her hair is styled into really soft, sleek, and loose waves.
This is a really modern way how to wear curls. They look natural, as if you didn't do anything and that's just how amazing your hair looks when you roll out of bed in the morning...yeah right!!!!
Oh and a bonus picture in which I edited my hair color for the thumbnail just for fun. (I don't color my hair at all anymore, my current color is simply my natural hair.) So to anyone who has ever told me they would love to see me blonde: Here's why that will never happen!
Bangs (or fringe) are such a fun, quick and easy way how to really change your look, without having to take off too much length from your hair, especially if you have longer locks.
I've been itching to change up my look for a while, and having had bangs in the past before, I knew what to expect from them. I loved having bangs when I was going to university, but then they just became too high maintenance for me over time. Since my hair is not naturally stick straight, especially the front sections which have a decidedly unruly mind of their own, it means blow drying and straightening bangs after every wash.
So why would I got back to that? Well, life is short and if you want to do something, just do it. Especially your hair! If you don't like it, it will grow out again. Take risks with your looks, why not? You could always try clip-in bangs first to see how it would look on you, but nothing compares to the real thing.
Watch my video to see how I cut my bangs myself. I want a more wispy, edgy look rather than blunt cut, I just think it suits me more.
Here are my Tips for cutting your own bangs:
Use good, sharp scissors instead of a razor to prevent split ends (especially on fine hair) - you can pick up decent hair trimming scissors at drugstores or beauty supply stores for not much money
Cut your bangs on dry hair to prevent cutting them too short - hair puffs up when dry!
Section your hair and securely pin back the parts of your hair you don't want to accidentally snip
Start off longer, then gradually cut the hair to the exact length you want - nothing more awkward looking than too short bangs!
Styling Products I used in the video:
L'Oreal Smooth Intense Xtreme Straight Creme
L'Oreal Precious Oil Treatment
Sebastian Shine Crafter Wax
Nail polish I'm wearing:
KIKO Nr. 335
What do you think of the new look? Have you ever tried bangs yourself?
Lara Croft is my favorite game series ever! I'm not a die-hard gamer by any stretch of the imagination, but the Tomb Raider series is one I've always loved to play, and always bought the games when they are first released.
I've been patiently waiting for this new game to come out, meanwhile I've been watching game trailers and checking the Tomb Raider facebook site for updates. Lara's look has changed quite a lot from the previous games - she looks a lot more realistic, gone are the ridiculous Barbie sized boobs, and the tiny hot pants. Instead, we have a young woman who becomes a fierce and strong fighter.
I couldn't resist to Cosplay her! I've been wanting to make a Lara Croft video for ages, and when I heard a new game was coming out, I knew I wanted to cosplay her updated look. Watch my video below on everything I used to recreate her look, her costume, and even her weapons!
Outfit
Cargo pants: H&M Men's (dirtied up with charcoal & ash)
Tank tops: H&M (dirtied up with soil)
Boots: Steve Madden (you can also check out an Army surplus store)
Props & Weapons
Gun holster: army surplus
belts: previously owned by me, one of them is an old Austrian army belt
Gun: an antique revolver borrowed from a friend (selling replica toy guns is illegal here!)
Bow & arrow: made out of several reeds I gathered from a forest, tied together with rope, the front grip is a bandage that I dirtied up
Makeup & Hair
Blood: Kryolan Film Blood
Eyes: Ben Nye Cork, Maybelline Colossal waterproof mascara
Blush: Ben Nye Natural Blush
Lips: L'Oreal Colour Riche in Sheer Nude
Hair product: Balea Trend It Up Mattifying Styling Paste
Make sure to get yourself really grubby for this look! It's half the fun, and will make it so much more realistic!
This is my OMGWTF Bright and Bold makeup look that's inspired by spring. It's not necessarily a typical spring-ish look, but I wanted to break out of the many smokey and dark looks we've seen for fall and winter and bust out something super fun and colorful!! Um, mission accomplished...? I hope you love this look, even if you don't wear it out to work or school (haha) maybe you can give it a whirl sometime, or just to practice your skills!
Watch my video tutorial for the step-by-step to recreate this look!
Here's all the products I used...
Face
L'Oreal Visible Lift foundation, L'Oreal Color Lift Blush in Rose Gold
Eyes
NYX Jumbo Pencil in Milk, Sleek Make Up i-Divine palette in Lagoon (launches March 13, 2013), MAC Chrome Yellow, Ben Nye Toast, Maybelline gel liner in Ultra Violet, Rimmel Scandaleyes mascara, Sleek Make Up lashes in Savannah, KIKO Glamorous pencil Nr. 411
Beyonce is hot, hot, HOT right now and I've had many requests by you to do a make-up look inspired by her. I looked around and saw the extravagantly styled ad for her Mrs. Carter Show World Tour, with inspiration drawn from Marie Antoinette, or some kind other Romantic period queen. These are some screenshots I took from the ad, which inspired by look.
I did some strong contouring prior to filming with my foundation, then focused on the almost "plastic" looking red, sumptuous lips, and the over-blushed cheeks. The eyes are kept very neutral, with a bit of shimmer and a dose of fluttery lashes. The look is simple but quite striking!
Here's my tutorial:
Face and Cheeks
L'Oreal Visible Lift foundation, Barry M Natural Dazzle bronzer, Inglot blushes 20 and AMC 58
Eyes
Kryolan Eyeshadow Base, MAC Malt, MAC Copperplate, Ben Nye Toast, Urban Decay Sin, L'Oreal Infallible black gel eyeliner, Maybelline Natural Glaze eyeliner, MAC Handwritten, Quo lashes Nr. 805
Lips
Catrice Lipliner "The Roof is on Fire", MAC Red lipstick, Kryolan High Gloss in Vamp
Sigma has released nine brand new eyeshadow bases, and I decided to put them to the test to see how well they work, and if they really stop eyeshadow from fading and creasing. The nine shades released are:
Persuade: Creamy light beige (no shimmer)
Dash: Deep dark plum (no shimmer)
Pose: Brown burgundy (with shimmer)
Provoke: Light peach (with shimmer)
Pursue: Medium warm purple (with shimmer)
Sculpt: Charcoal grey (with shimmer)
Spy: Duo-chrome green-brown (light shimmer)
Strike: Rusty red (with shimmer)
Unveil: Bronzed gold (with shimmer)
Price: $13 USD each, or a set of 3 (pre-determined) with an applicator brush for $36 USD
Top row L to R: Persuade, Provoke, Unveil
Middle row L to R: Pursue, Strike, Dash
Bottom row L to R: Pose, Spy, Sculpt
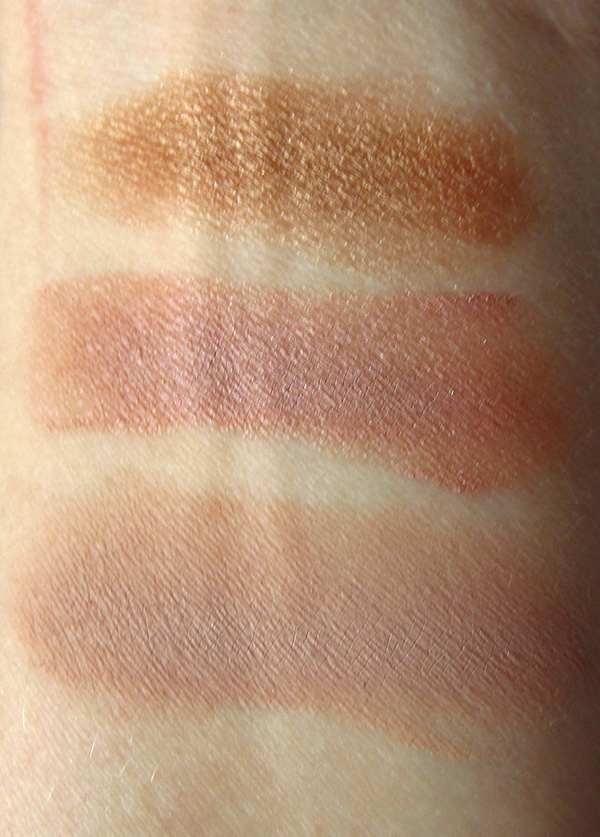
Top to bottom: Unveil, Provoke, Persuade
Top to bottom: Dash, Strike, Pursue
Top to bottom: Sculpt, Spy, Pose
Here's what I like about them:
Interesting colour choices with some nice finishes, and several nude shades for lighter skin tones
Easy to blend and apply, either with a finger or brush
Hold the eyeshadow in place without much noticeable creasing for about 6 hours
Relatively affordable price
Packaging has a plastic stopper lid to further help prevent drying out
What I don't like so much:
Texture is a bit thin and slippery when applying, I prefer my bases to be a bit richer and stick stronger to my lid
The nude colours don't enhance the vibrancy of the powder eye shadows you apply on top
Light creasing and colour fading after about 2 hours, noticeable creasing, smudging and colour fading after about 6 hours of wear
Staining of the lid with the more vibrant colours, slightly hard to remove the stain
Made in China - Some people might take offence at that, but I'm always a bit weary of makeup made in China because I have really no idea what kind of conditions the makeup is produced in, how stringent the Chinese government is on health and safety inspections, and the true cost of the product is probably insanely low, meaning the company makes a huge profit on mark-up. I know some people might argue that I should thus avoid buying anything made in China, but it's become virtually impossible nowadays to avoid all products made in "The World's Factory". The question is then what you think is ok for you, and what you'd rather avoid.
Bottom Line:
I think these probably aren't the hands down best eyeshadow bases out there, there is always room for improvement, but I was pleasantly surprised how well they held up for 6 solid hours of wear, before I noticed visible creasing and fading. The trio sets are a good way to try out a few colours at once, and also come with a brush for easy application if you don't have a lot of makeup brushes yourself. The colours are nice and I like the fact that there's a couple great nude shades in there, and the pigmentation of the colourful ones is pretty good.
10% off code for February! The code BASE2013 will be valid for 10% off your entire purchase from February 1-28, 2013
Disclaimer: The above is an affiliate link and all products were sent to me from Sigma. I have no direct affiliation with the brand and do not work for them directly, I am not on their payroll and I am not encouraged to endorse the brand in any way. I will always tell you straight up what I like, and don't like about any product that's sent to me to try.If you want to buy Sigma products, more power to you, and I would really appreciate if you do decide to use my affiliate link since it takes me time to do these reviews, make swatch pictures, buy the necessary camera equipment, etc. If you choose not to, no problem. I would never want anyone to buy anything they didn't really want or need!
Last evening I had a Live TV interview on Joiz TV, a Swiss television network. What I love about Joiz is that it's focused toward a young and engaged audience, their employees are largely 30 years old and younger, and their shows are all integrated with Facebook, Twitter, online chatrooms and other online content. A perfect platform for me to be introduced to such a great audience!
Here are all the parts of the interview, just click on the link to watch. It's in German, but maybe you can pick up some parts. And thank you so much to everyone who tuned in on TV, online through their website, and who sent in audience questions on their chatroom. Your support was great!
The 30 minute interview was split into multiple parts. Some of the issues that were addressed: Who I am and how did I get into Youtube, why has my channel been so successful, why did I get into makeup and where are my roots from professionally, what my vision is for the future, how do I deal with both positive and negative feedback, what it's like to produce content for Youtube all on my own, how I deal with cosmetic brands, how has my life changed since my Youtube fame.
Thank you to everyone at Joiz for the opportunity!
I've got some fun new products from Sleek to show you from their upcoming spring collections, so get ready! First up, the True Colour Lipsticks. The formulation is highly pigmented, available in matte or sheen finish, and they come in bright colors that are very in trend for spring 2013.
True Colour Lipsticks in Loved Up, Tangerine Scream and Smoulder (£4.99)
Loved Up
Tangerine Scream
Smoulder
My thoughts: I'm loving all up on Loved Up!!!! Wow - it's incredible. It's one of those BAM in yo face kind of colours, which I personally love. Super creamy, feels smooth to wear, and very opaque. These are great lipsticks, especially when you consider the low price. I'd love to try out more colours as I think they're really cool!
Next up are the Flick It Eyeliner pens, of which the black one is permanent, and the purple and blue ones are limited edition. They have a felt tip end, and are fairly easy to apply for a cat-eyed look. Launching February 13, 2013.
Flick It Eyeliner in Royal Blue, Dazzling Black and Purple Aura (£5.99)
My thoughts: I'm not wowed about these because I don't think the colours are really all that original, and I'm generally not too fond of pen tip eyeliners. I always find they dry out really fast, and I just prefer to work with a brush. They did, however, last incredibly long. I washed my hand several times with soap after swatching, and the colour was still there. You'll have to remove these with an oil-based eye makeup remover, and some eyelid tugging might ensue. Long lasting yes, but a bit hard to remove.
Lastly, I was sent some of the new Sleek Eyelashes, which have newly launched.
My thoughts: They all look slightly "fake" when wearing, which might or might not be a good thing, depending on what look you're going for. If you want lashes that really stand out and look unique and sort of artificial and artsy on your eyes, these might be a good find. If you're more a fan of natural looking falsies that blend really well with your own lashes and don't stand out too much, these aren't so great. They are very long, and the band to apply is very thick, so they tend to stand out and draw a lot of attention. The shapes are also not very natural, so they will obviously look fake. That might work for a more dramatic look though, so it just depends what you prefer!
Here's my nail design tutorial inspired by upcoming Valentine's Day. Although, I think you could really wear this anytime, it's so cute! Watch my video below for the tutorial:
Products used:
Sally Hansen Insta-Dry Whirlwind White
Anny Outdoor Style
L'Oréal Fancy Me
Maybelline Deeply in Love
L.A. Colors Art Deco White
Seche Vite
Question: Will you be wearing a Valentine's inspired nail design on February 14th?? Let me know in the comments!
xo, Julia
Many of you have asked about this, and I finally set up an account on Bloglovin if you want to follow my blog through their service! Use the link posted above. If you've never tried Bloglovin, it's a free service to keep up with your favorite blogs on the Interwebs.
Oh and I have 666 followers right now, so you'd better help me get past that foreboding number - Muahahahaha!
Today I've got a few pieces from the Smashbox Love Me Spring collection to show you, and I have to say - I love a couple of these products so much already! The collection was created in collaboration with street artist Curtis Kullig, with his signature print decorating both the packaging and the cosmetic products themselves (blush and lipstick imprint.) I got these a few weeks ago and have had a chance to try all the products, so here are my thoughts.
Left to Right: Love Me Blush in Idolize Me, Love Me Be Legendary lipstick in Tempt Me, Love Me Paint Pen Eye Liner in Jet Black
First things: Packaging! I absolutely love it. The blush comes with a nice sized mirror, the lipstick looks sleek, and the red writing on the front is really nice.
Next, I really absolutely LOVE the blush color, I don't have anything exactly like it in my collection. It has a satin finish without any garish sparkles, and the color is a soft pink, leaning slightly coral when worn. The pigmentation is really good, and very buildable, so if you have fair skin - no worries that you will look like a clown on the first swipe. I'm really starting to love Smashbox blushes!
Here is a swatch of the blush, and the pen liner on my hand, wherein I applied several layers of the blush for a really strong pay-off for swatching purposes.
The lipstick in Tempt Me is another great product, with an absolutely perfect color payoff that I think is so nice for spring. It has medium coverage, so you can either wear it more sheer, or apply two coats for an opaque finish. I would describe it as a warm pink, that leans ever so slightly into coral. The lipstick contains shea butter so it's very moisturising and super comfortable to wear, without being too slippery that it immediately creases and feathers into fine lip lines. I really like this lipstick a lot!
The only product I don't care very much for is the eyeliner. It's quite bulky and the tip is really thick, so I feel like I'm applying my eyeliner with a jumbo Crayola marker. I prefer more the thin tips, or an art brush for an eyeliner. However, the thickness of the tip means it's also more sturdy and easier to get an even line. I also felt the color wasn't black enough, it looked more like a very dark grey on me.
Have you tried any Smashbox products? Let me know your favorites in the comments below!
Switzerland Prices:
Love Me Lipstick (26 CHF)
Love Me Blush (40 CHF)
Love Me Paint Pen Eye Liner in Jet Black (29 CHF)
Available at Marionnaud, and wherever Smashbox products are sold worldwide.